
In February Pivotal released Spring Boot 2, the first release officially supporting Spring 5. Highlights of this release include reactive web framework – WebFlux, and extended Kotlin support. This article starts with walking you through introduction to reactive programming. Then we’ll dive into the process of creation a reactive web service using Spring WebFlux and Kotlin – with a closer look on the superb Kotlin support in Spring. As always, you can find the complete source code on this GitHub repository.
What is reactive programming?
To keep it as simple as possible, reactive programming is programming with asynchronous data streams. This allows applications to react on changes. Like in real life – we react accordingly to what’s happening around us. We don’t perform the same sequence of moves everyday and we don’t say same things in the same order everytime.
To put it in more technical context, based on Reactive Streams Specification – we subscribe to a publisher’s result of action.
In our case, Spring uses Project Reactor that implements Reactive Streams and extends it with additional types – Mono and Flux. These two types implement the Publisher interface and they have one clear difference:
- Flux emits collection of results
- Mono emits at most one result
It’s enough introduction, let me show you how reactive programming works in practice and what are new Spring Boot 2 features made especially for Kotlin.
Project bootstrapping
As many of you may know, one of the Spring’s components is a quickstart project initializer called Spring Initializr. With minimal participation, anyone can configure a fully working web application. It has a possibility to define all the aspects of the project you want to work on: JVM language and its version (currently three available: Java, Kotlin, Groovy), dependencies, project naming etc. You can find Spring Initializr under start.spring.io. Let’s set it up according to our needs and hit “Generate Project”:
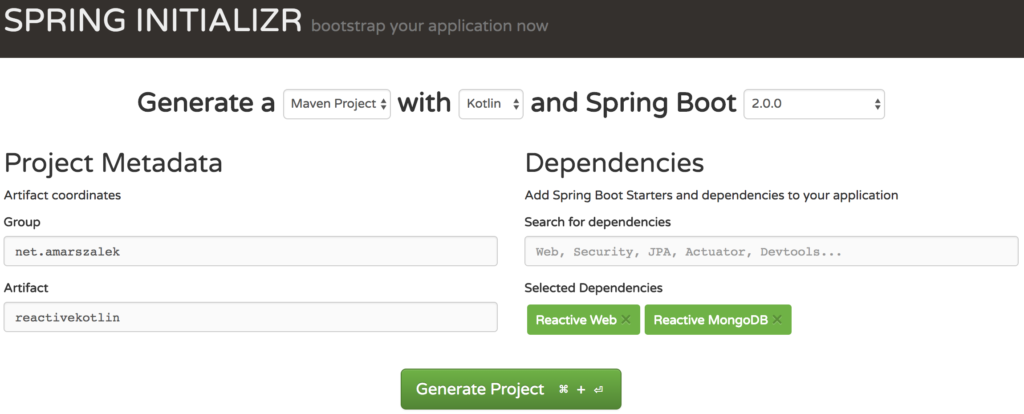
Download of an archive will start. Unzip it and import to your IDE of choice. Mine is IntelliJ Idea. Now let’s see what’s happening in our pom.xml.
Generated pom.xml inspection
At first sight, what jumps out at me is the version of Kotlin. Unfortunately, it’s not always up to date. In this case I have 1.2.20 in my properties, when at the day of writing this article, Kotlin is in version 1.2.31.
The dependencies contained in the generated pom.xml are pretty standard for my taste, so let’s skip them and move directly to the build section.
<build>
    <sourceDirectory>${project.basedir}/src/main/kotlin</sourceDirectory>
    <testSourceDirectory>${project.basedir}/src/test/kotlin</testSourceDirectory>
    <plugins>
      <plugin>
        <groupId>org.springframework.boot</groupId>
        <artifactId>spring-boot-maven-plugin</artifactId>
      </plugin>
      <plugin>
        <artifactId>kotlin-maven-plugin</artifactId>
        <groupId>org.jetbrains.kotlin</groupId>
        <configuration>
          <args>
            <arg>-Xjsr305=strict</arg>
          </args>
          <compilerPlugins>
            <plugin>spring</plugin>
          </compilerPlugins>
        </configuration>
        <dependencies>
          <dependency>
            <groupId>org.jetbrains.kotlin</groupId>
            <artifactId>kotlin-maven-allopen</artifactId>
            <version>${kotlin.version}</version>
          </dependency>
        </dependencies>
      </plugin>
    </plugins>
  </build>
We can see that there’s a dependency called kotlin-maven-allopen attached. It’s used for configuring the kotlin-spring plugin. What is it? Well, as you probably know, Java classes can be inherited without any hassle. It’s opposite in Kotlin. Every object in Kotlin is immutable (final) by default. Spring Framework uses inheritance to create proxy classes for every bean class/method annotated with @Service, @Bean etc. We could try and remember to add the open modifier to every Spring’s component in our project or let the automation take care of it for us. This plugin scans the whole project and adds necessary modifier under the hood.
By the way, there’s a similar plugin for JPA that creates a default constructor. You can read more about it in the Kotlin documentation.
The first class Kotlin support in Spring Boot 2
Since Spring 5, the framework started to offer a native Kotlin classes and extensions therefore the integration has become smooth and easy. I’m going to take you through some of them, but if you want to see complete list of classes that offers the support, visit Spring’s doc.
1. Bean definition DSL
Now you can define your bean definitions in a really simple functional way, using Kotlin DSLs:
beans {
    bean("messageSource") {
        val messageSource = ReloadableResourceBundleMessageSource()
        messageSource.apply {
            setBasename("translations")
            setAlwaysUseMessageFormat(true)
        }
    }
Unfortunately, making use of it in Spring Boot is a pain in the neck. Sebastien Deleuze, the main contributor of Kotlin support in Spring, explained it pretty well in this StackOverflow post.
2. Reactor extensions
Kotlin reactor extensions has been merged into Reactor-core 3.1 which is used by Spring. Because of this every object in your project has available native toFlux()/toMono()methods. Examples:
"myString".toMono()
usersList.toFlux()
User("username").toMono()
3. Leveraging null-safety
You may wonder why I skipped explaining what is the JSR-305 argument in the pom file above. It belongs to this section 🙂 This specification contains a set of annotation such as @NonNull that assists code analysis tools to find possible bugs. In Spring 5, they’ve been added throughout the whole project and with the jsr-305 argument set to strict, Kotlin can make use of them. For example that is why we have possibility to skip explicit definition of required HTTP parameters: @RequestParam id: Int? instead of @RequestParam(required=false) id: Int?
4. Functional DSL Routing
This release of Spring comes with another DSL for functional routing. You can now forget about your classic controllers and request mappings, instead you can make it more concise with this new DSL.
router {
        ("/books" and accept(MediaType.APPLICATION_JSON)).nest {
            GET("/", booksHandler::getAll)
            GET("/{title}", booksHandler::getByTitle)
            POST("/", booksHandler::add)
        }
    }
We’ll look into the implementation of actorsHandler a little bit later.
5. Spring Data
Some of the Spring Data modules also added support for Kotlin. For example, Spring Data MongoDB now comes with a long list of extensions for the MongoOperations class. You can go through this merge request if you want to learn about the details.
Creating a Kotlin + Spring Boot 2 reactive web service
If you didn’t open the generated project yet, do it now. We’re going to create a simple library application. Nothing fancy, but enough to demonstrate the possibilities given us.
Let’s create a new file: the first one called Routing.kt and the second BooksHandler.kt. As you probably already guessed, we’ll put our routing code in the first file:
@Configuration
class Routing {

    @Bean
    fun booksRouter(handler: BooksHandler) = router {
        ("/books" and accept(MediaType.APPLICATION_JSON)).nest {
            GET("/", handler::getAll)
            GET("/{title}", handler::getBook)
            POST("/", handler::addBook)
        }
    }

}
We don’t need to show Boot that this configuration exists, it’ll notice 🙂
And BooksHandler.kt, thanks to Kotlin, can contain everything book-related inside:
@Document
data class Book(@Id val id: String? = null,
                val title: String,
                val author: String)

@Component
class BooksHandler(private val repository: BookRepository) {

    fun getAll(request: ServerRequest) = ok().body(repository.findAll())

    fun getBook(request: ServerRequest): Mono<ServerResponse> {
        val title = request.pathVariable("title")

        return ok().body(repository.findByTitle(title))
    }

    fun addBook(request: ServerRequest): Mono<ServerResponse> {
        val book = request.bodyToMono<Book>()
        return ok().body(repository.saveAll(book).toMono())
    }
}

@Repository
interface BookRepository : ReactiveCrudRepository<Book, String> {
    fun findByTitle(name: String): Mono<Book>
}
Going from the bottom, you can find a classic Spring Data’s repository with one difference – it inherits ReactiveCrudRepository instead of classic CrudRepository. As a result, every method returns entities wrapped in Mono/Flux instead of directly giving it to you. Right now only MongoDB, Redis and Cassandra support reactive access in their drivers. Another thing you may be wondering is: what about configuration? If your Mongo server is running on default settings, there’s no need to set up anything in the project. Spring Boot is all about convention over configuration.
In the BooksHandler class we inject the repository through constructor. No need for @Autowired or @Inject. Every method that is called from our router has a ServerRequest object passed as the argument. Basically, the ServerRequest class contains all the information needed to handle and operate on current requests.
And finally, a classic data object for storing information about entity/document. It should be self-explanatory.
Making use of reactive stack
Well, unless you have to, you shouldn’t really use reactive programming for the sake of putting it in your résumé. I’m going to show you a possibility of using Server-Sent Events together with Spring WebFlux. Shortly, SSE allows client (i.e. web browser) to obtain updates from the server without asking for them. Let’s slightly modify the handler:
@Component
class BooksHandler(private val repository: BookRepository) {

    fun getAll(request: ServerRequest): Mono<ServerResponse> {
        val interval = Flux.interval(Duration.ofSeconds(1))

        val books = repository.findAll()
        return ok().bodyToServerSentEvents(Flux.zip(interval, books).map({ it.t2 }))
    }
//...
}
In the getAll method there’s a new val called interval that simulates some delay for obtaining data. Then, we changed building our response from the body method to bodyToServerSentEvents that also takes Mono/Flux as the parameter. In this case, our parameter is zipped interval and Flux containing books. We map it to the second object (a book) of created Tuple in zip.
Now, after putting some data in the storage, we can acces /books endpoint. If your client support events stream, you should see something similar to this:
 Conclusion
As you can see, writing reactive web service in Kotlin with assistance from Spring Boot can be a real pleasure. Let’s hope that the future releases of Spring will bring us even better support from their side.
If you have any questions or just want to share a thought, feel free to comment.


In the RoutingTest
you mentioned
val bodyToMono = retrieve
.onStatus(HttpStatus::isError, { Mono.error(Exception()) })
How to catch the error (assuming there is error, example the server is down)
I would like to Print the error and return a Default Book
I’m not sure about the need of returning a default book if server is unreachable in tests, but you can check the error response like that:
client.get().uri("/books/{title}", bookTitle).exchange().expectStatus().is5xxServerError
.expectBody()
.jsonPath("$.errorMessage").isEqualTo("errorMessage")
Check the updated GitHub repo.
Numerous Java server frameworks happily run any JVM bytecode, whether the code was originally written in Java, Kotlin, Scala or even JRuby. Many thanks for sharing this.
Nice sample.
Where is client package coming from?
client is WebClient from Spring->WebFlux 5.x.x version
I tried to do something by myself, I was pretty close to finish, but I could save a new entity, I was using save instead saveAll method in reactiveCrudRepository, by using save I always got null for the Id, when I changed it to saveAll it worked.
Do you know why, or what is the difference between them?
Thanks a lot
What I don’t like about the way the code is structured with the router function and the handler classes, is that the path variables and request parameters are defined in the router function, and the handler implementation must match that exactly. If there is a mismatch, it won’t be apparent because they are implemented in different places.